1. 在Visual Studio Code輸入#號時會顯示Color Decorator視窗,在寫scripting語言時很惱人,可以依照下列步驟關閉。


3. 在搜尋欄位中輸入"color decorators",搜尋到下圖所示選項,取消勾選"Editor: Color Decorators"。

1. 在Visual Studio Code輸入#號時會顯示Color Decorator視窗,在寫scripting語言時很惱人,可以依照下列步驟關閉。
1. 將異質零件(Heterogeneous Part)重新編號時出現Error。
ERROR(ORCAP-1376): Cannot perform annotation of heterogeneous part 'CON?D.......

2. 先點選其中一組異質元件,按"滑鼠右鍵"後點選"Edit Properties..."。


1. 設定專案前確認電腦的Windows安裝與設定。
a. 安裝Visual Studio Code,並設定好支援Verilog語法插件。
b. 安裝編譯與模擬波形的QuestaSim。
c. 下載Mingw-w64與設定環境變數。
2. 設定專案資料夾,如下圖所示。


4. 開啟Visual Studio Code編輯程序。

########Test.v########
module Test(a, b, c, d, En, Sel, f);
input a, b, c, d, En, Sel;
output f;
wire f;
wire g, h, i, j;
assign g = a | b;
assign i = g & En;
assign h = c | d;
assign j = h & En;
assign f = (Sel==1'b0) ? i : j;
endmodule
5. 輸入完成,在Visual Studio Code開啟Terminal如步驟4圖示,先輸入"make rebuild"編譯,再輸入"make debug",顯示波形如下圖所示。

1. 確認電腦上都安裝了Quartus與QuestaSim。

2. 點選"Tools" > "Options..."。

3. 點選"EDA Tool Options",在QuestaSim欄位輸入QuestaSim安裝的路徑,我這裡輸入"C:\questasim64_10.6c\win64",輸入完成按"OK"。

4. 這一步設定需要在專案中設定,當專案設定好且RTL code與testbench都轉寫好了,準備開始進行模擬,點選"Assignments" > "Settings..."。

5. 點選"Simulation",在"Tool name:"欄位中選擇"QuestaSim","Compile test bench:"欄位加入專案的testbench.v檔。

6. 設定完成開始模擬之後的結果如下圖所示,改用QuestaSim模擬。
1. 先將可以上網的電腦安裝Visual Studio Code,再依據下圖步驟下載支援Verilog語法的VSIX檔案。


1. 至Mingw-w64的網站下載執行檔,下載網址: https://www.mingw-w64.org/downloads/
2. 點選MinGW-W64-builds欄位。

3. 點選MinGW-W64-builds欄位下的GitHub。

4. 選擇下載版本,我這裡選擇"x86_64-15.2.0-release-posix-seh-ucrt-rt_v13-rev0"。
x86_64: 代表64-bit x86架構
15.2.0: GCC 15版本
release: 正式發布版本
posix: 使用POSIX threads API,在Windows上透過MinGW-W64實作,適合Linux/Windows跨平台程式
seh: Structured Exception Handling,Windows原生例外處理機制,僅支援x86_64,效能好
ucrt: 使用Universal C Runtime,微軟現代CRT(Windows 10+內建),與MSVC相容性高。

5. 下載至"C:\Program Files"並解壓縮。

6. 至"C:\Program Files\x86_64-15.2.0-release-posix-seh-ucrt-rt_v13-rev0\mingw64\bin"路徑下,點選"mingw32-make"。

7. 修改名稱為"make"。

8. 至"系統內容" > "環境變數"。

9. 點選"系統變數" > "Path" 後按"編輯"。

10. 按下"新增",增加"C:\Program Files\x86_64-15.2.0-release-posix-seh-ucrt-rt_v13-rev0\mingw64\bin"路徑後按"確定"。

11. 在搜尋欄位中輸入"cmd",開啟"命令提示字元"。

12. 輸入"make -v",顯示GNU Make的版本就表示設定成功。


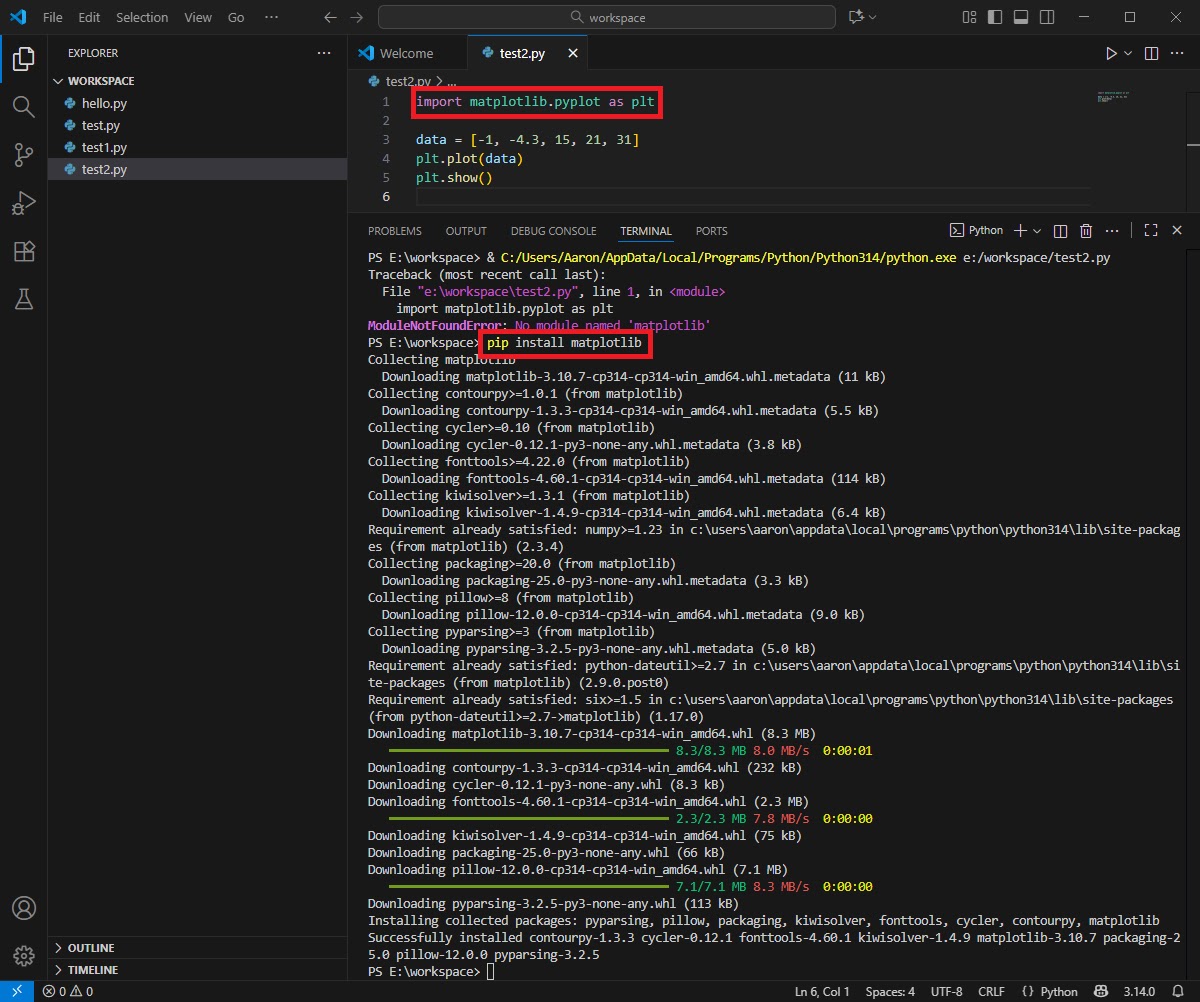
1. 在輸入"import matplotlib.pyplot as plt"程式碼,執行出現下列錯誤
import matplotlib.pyplot as plt
ModuleNotFoundError: No module named 'matplotlib'
2. 需安裝Matplotlib套件,在終端機輸入"pip install matplotlib",如下圖所示,安裝完成就可以執行Matplotlib套件功能。