Qt4.6.0 for Embedded Linux編譯過程,與Qt4.5版有3個不同的差異,但是基本上都是一樣的.
http://cid-b01cb9ac20175eaa.skydrive.live.com/self.aspx/Qt%20for%20Embedded%20Linux%204.6.0/Qt%204.6.0%20for%20Embedded%20Linux.pdf
2005年6月8日 星期三
2005年6月2日 星期四
Old-Embedded Linux系統視窗程式設計-QT(4-2)移植tslib
1. 開發環境:
(1). CPU: Andes RISC CPU core_N12.
(2). 平台: ADP-XC5FF676 V1.1.
(3). Linux OS: Ubuntu9.04.
(4). Toolchains: AndeSight v1.3.3 for Linux.
(5). Embedded Linux2.6.18
2. 目的:下載並移植tslib,tslib為QT for Embedded Linux 控制觸控面板的函式庫.
3. 下載與移植:
(1). 至下網址下載〝tslib-1.0〞.
http://cid-b01cb9ac20175eaa.skydrive.live.com/self.aspx/tslib-1.0/tslib-1.0.zip
注意:編譯前,先在根目錄指定Toolchains,使用〝Terminal〞輸入〝source bashrc.nds32le-linux-V0〞,指定編譯路徑.
(2). 使用〝Terminal〞輸入〝tar -xvf tslib-1.0.tar〞解壓縮.
 (3). 輸入〝cd tslib-1.0〞進入tslib-1.0目錄.
 (4). 輸入〝./autogen.sh〞(需先使用System->Administration->Synaptic Package Manager 安裝:m4;autoconf;automake;libtool).
 (5). 至〝config.sub〞修改程式,依下列所示增加參數,這裡要非常注意容易出錯(Tab鍵與空白鍵的差異)〞.
 (6). 至〝configure.ac〞修改程式,依下列所示,將〝AC_FUNC_MALLOC〞註解掉.
 (7). 使用〝Terminal〞輸入〝./configure --prefix=$PWD/_install CC=nds32-linux-gcc --host=nds32-linux ac_cv_func_malloc_0_nonnull=yes〞.
 (8). 在Desktop上新增〝nds32〞檔案夾,用來存放building後產生的執行檔.
 (9). 新增〝build.sh〞檔,撰寫下列程式.
注意: 〝build.sh〞檔,已撰寫好,與放在tslib-1.0.zip內,但還是需要修改使用者路徑. (10). 將〝build.sh〞檔放置〝tslib-1.0〞目錄下.
 (11). 使用〝Terminal〞輸入〝./ build.sh〞開始building.
 (12). 在Desktop上新增檔案夾,內路徑〝/home/acer/Desktop/nds32/home/acer/Desktop/nds32〞產生下列四個檔案夾.
 (13). 開啟〝/home/acer/Desktop/nds32/home/acer/Desktop/nds32/etc/ts.cof〞檔案
 ,將〝# module_raw input〞改成〝module_raw input〞#號拿掉後存檔.
 (14). 將〝/bin;/etc;/lib〞三個檔案夾複製至SD卡.
a. 注意:一般SD卡格式都為FAT32,在Linux下無法顯示長檔名,如要支援長檔名請將SD卡format成EXT2或是EXT3格式.format步驟如下所示: http://andescore.blogspot.com/2009/02/format-sd-cardext2.html
b. 因目前ADP-XC5開發板上所使用的OS為AndeSight v1.3.1 Toolchains building 會造成錯誤,請依照Embedded Linux系統(C)_在SD card上執行Embedded Linux http://cid-b01cb9ac20175eaa.skydrive.live.com/self.aspx/Embedded%20Linux%202.6.27%5E_2/XC527 執行AndeSight v1.3.3 Toolchains building的OS,再執行/bin下的執行檔程式.
(15). 使用〝超級終端機〞輸入〝mount –o mand /dev/cf /tmp〞掛載SD 卡. (16). 輸入export參數:
export LD_LIBRARY_PATH=$LD_LIBRARY_PATH:/lib:/tmp/lib
export TSLIB_TSDEVICE=/dev/input/event0
export TSLIB_CALIBFILE=/tmp/etc/pointercal
export TSLIB_CONFFILE=/tmp/etc/ts.conf
export TSLIB_PLUGINDIR=/tmp/lib/ts
export TSLIB_FBDEVICE=/dev/fb0 (17). 輸入〝cd tmp/bin〞至SD卡執行檔位置.
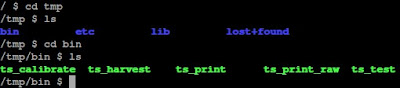 (18). tslib-1.0下共有五個測試執行檔:
a. 共有〝./ts_calibrate〞;〝./ts_harvest〞;〝./ts_print〞;〝./ts_print_raw〞; 執行〝./ts_test〞結果如下所示.
b. 再執行〝./ts_calibrate〞,會在SD卡〝/tmp/etc/〞下產生〝pointercal〞定位檔,需給下一章節QT for Embedded Linux使用.
注意: ADP-XC5實驗板Embedded Linux進入休眠狀態時,輸入
〝printf “\033[9;0]” > /dev/tty0〞,開啟.
注意:中斷測試程式按〝Ctrl+C〞.
(19). 程式執行完畢後要卸載SD需再根目錄輸入〝umount /tmp〞.
訂閱:
文章 (Atom)