2016年11月25日 星期五

Lattice Diamond 3.8 - (9) 瀏覽FPGA實體電路的結果

(1). 選擇"Physical View"顯示結果。

Lattice Diamond 3.8 - (8) 瀏覽數位電路圖設計的結果

(1). 選擇"Netlist"顯示結果。

Lattice Diamond 3.8 - (7) 瀏覽FPGA腳位封裝

(1). 選擇"Package View"顯示結果。

2016年11月24日 星期四

Lattice Diamond 3.8 - (6) 燒錄FPGA

(1). 選擇"Programmer"。

(2). 選擇欄位"Cable:"設定所使用的Download cable,之後在選擇"Port:",設定完成按"OK"。

(3). 在"File Name"欄位選擇"xxx_impl1.jed"檔。

(4). 先點選"JTAG Scam",連線FPGA之後再選擇"impl1.xcf"燒錄檔,最後點選"Program" 開始燒錄。

Lattice Diamond 3.8 - (5) 設定FPGA腳位與完整編譯

(1). 選擇"Spreadsheet View"。

(2). 產生"Spreadsheet View"標籤頁視窗。

(3). 在"Pin"欄位中選擇欲在FPGA信號輸出與輸入的IO腳位。

(4). 按"Save"存檔。

(5). 選擇"Process"標籤頁,使用"滑鼠左鍵"點選兩下"Export Files"開始完整編譯。

Lattice Diamond 3.8 - (4) 模擬

(1). 選擇"Simulation Wizard"。

(2). 選擇"Next >"。

(3). 在"Project name:"欄位中輸入模擬計畫的名稱後按"Next >"。

(4). 選擇"RTL"後按"Next >"。

(5). 在"Source Files:"欄位中可以看到數位電路程式(test.v)與模擬程式(testbench.v),勾選"Copy Source to Simulation Directory",會將test.v與testbench.v複製到新增模擬的檔案夾中,之後按"Next >"。

(6). 可以看到在"Simulation Top Module:"欄位中看到模擬程式為testbench.v,之後按"Next >"。

(7). 最後按"Finish"結束設定。

(8). 軟體會自動開啟"Active-HDL"並顯示結果。

Lattice Diamond 3.8 - (3) 新增Test bench

(1). 選擇"File List"標籤頁,之後再選擇"Input Files",按"滑鼠右鍵",選擇"Add" > "New File..."。

(2). 選擇"Verilog Files",之後在"Name:"欄位中輸入檔案名稱後按"New"。

(3). 輸入程式。

`timescale 1 ns/1 ns

module testbench;
reg a, b, c, d, En, Sel;
wire f;

Test UUT(
.a(a),
.b(b),
.c(c),
.d(d),
.En(En),
.Sel(Sel),
.f(f) );
initial
begin
 a   = 1'b0; // Time = 0
 b   = 1'b1;
 c   = 1'b0;
 d   = 1'b1;
 En  = 1'b0;
 Sel = 1'b0;
 #20; // Time = 20
 a  = 1'b1;
 #10; // Time = 30
 b  = 1'b0;
 c  = 1'b1;
 #10; // Time = 40
 a  = 1'b0;
 #10; // Time = 50
 En = 1'b1;
 #10; // Time = 60
 c  = 1'b0;
 #10; // Time = 70
 a  = 1'b1;
 d  = 1'b0;
 #20; // Time = 90
 c  = 1'b1;
 #20; // Time = 110
 a  = 1'b0;
 #10; // Time = 120
 a  = 1'b1;
 #10; // Time = 130
 c  = 1'b0;
 Sel= 1'b1;
 #10; // Time = 140
 a  = 1'b0;
 #30; // Time = 170
 a  = 1'b1;
 #10; // Time = 180
 c  = 1'b1;
 #20; // Time = 200
 a  = 1'b0;
end
endmodule


(4). 點選"Save"存檔後,選擇"Process"標籤頁,使用"滑鼠左鍵"點選兩下"Lattice Synthesis Engine"開始編譯。


Lattice Diamond 3.8 - (2) 新增Verilog程式檔案與編譯

(1). 選擇"File List"標籤頁,之後再選擇"Input Files",按"滑鼠右鍵",選擇"Add" > "New File..."。

(2). 選擇"Verilog Files",之後在"Name:"欄位中輸入檔案名稱後按"New"。

(3). 輸入程式。

`timescale 1 ns/1 ns

module Test(a, b, c, d, En, Sel, f);
input  a, b, c, d, En, Sel;
output f;
wire   f;

wire   g, h, i, j;

assign g = a | b;

assign i = g & En;

assign h = c | d;

assign j = h & En;

assign f = (Sel==1'b0) ? i : j;

endmodule


(4). 點選"Save"存檔。

(5).  選擇"Process"標籤頁,使用"滑鼠左鍵"點選兩下"Lattice Synthesis Engine"開始編譯。

Lattice Diamond 3.8 - (1) 新增Project

(1). 選擇"File" > "New" > "Project..."。

(2). 選擇"Next >"。

(3). 在"Name:"欄位中輸入計畫名稱,我這裡輸入"Teat",輸入完成選擇"Next >"。
在"Location:"為計劃檔案的所在位置,可以按"Browse..."選擇自己想存放的位置。

(4). 選擇"Next >"。

(5). 這裡需依照您所使用的FPGA型號設定,設定完成選擇"Next >"。

(6). 選擇合成的工具,我這裡選擇"Lattice LES"(Lattice Synthesis Engine,LES),設定完成選擇"Next >"。

(7). 完成設定,按"Finish"結束。

2016年7月6日 星期三

OpenCV 2.4 與 Visual Studio 2013(vc12)環境設定

1.  至http://opencv.org/downloads.html下載"OpenCV for Windows" VERSION 2.4.13解壓縮執行檔。

2. 將解壓縮執行檔放在"C:\"下,並執行。

3. 確定安裝路徑後按"Extract"。

4. 開始解壓縮,解壓縮完成會在C:\下多了一個opencv的檔案夾。

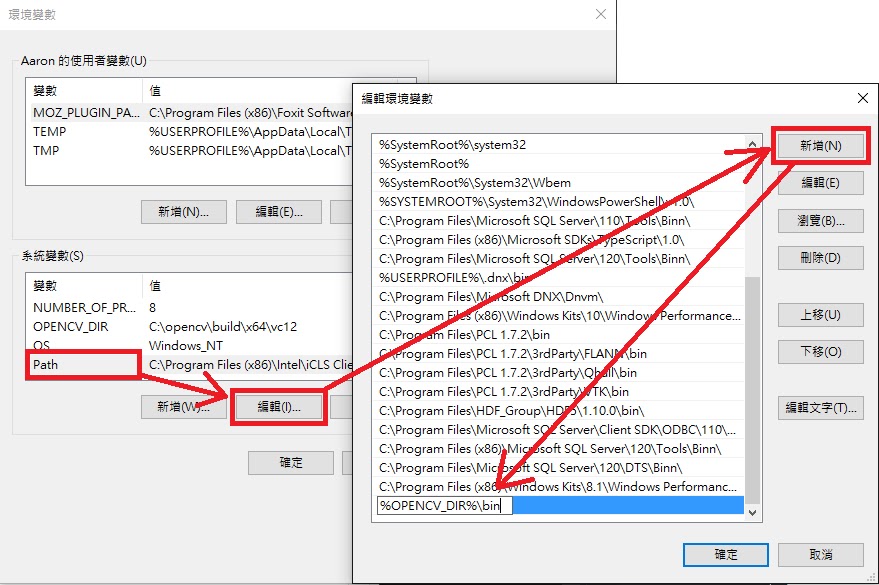
5. 至"控制台" > "系統",選擇"進階系統設定" > "環境變數"。

6. 在"系統變數"下選擇"新增",並在欄位輸入參數並按下"確定"。
變數名稱: OPENCV_DIR
變數值: C:\opencv\build\x64\vc12

**電腦系統為64位元,請選擇x64路徑,系統為32位元請選擇x86。
**Visual Studio 2013,請選擇vc12路徑,Visual Studio 2012,請選擇vc11路徑。

7.  之後再選擇"Path" > "編輯" > "新增",輸入參數後按"確定"。
Path: %OPENCV_DIR%\bin

8. 開啟Visual Studio 2013,選擇"新增專案"。

9. 選擇"Visual C++" > "一般" > "空專案"後按"確定"。

10. 將"組態管理員"設定成"Release"與"x64"。
**此輸入牽涉到函數庫的輸入參數。

11. 點選"方案總管"下的"Project1"按"滑鼠右鍵",選擇"屬性"。

12. 選擇"組態屬型" > "VC++目錄"在"include目錄"欄位輸入" $(OPENCV_DIR)\..\..\include" ,後按"確定"。

13. 之後再選擇"VC++目錄"在"程式庫目錄"輸入"$(OPENCV_DIR)\lib",後按"確定"。

14. 選擇"連結器" > "輸入",在"其他相依性"輸入參數。

如果在"組態管理員"設定成"Release",請輸入:
opencv_calib3d2413.lib
opencv_contrib2413.lib
opencv_core2413.lib
opencv_features2d2413.lib
opencv_flann2413.lib
opencv_gpu2413.lib
opencv_highgui2413.lib
opencv_imgproc2413.lib
opencv_legacy2413.lib
opencv_ml2413.lib
opencv_nonfree2413.lib
opencv_objdetect2413.lib
opencv_ocl2413.lib
opencv_photo2413.lib
opencv_stitching2413.lib
opencv_superres2413.lib
opencv_ts2413.lib
opencv_video2413.lib
opencv_videostab2413.lib

如果在"組態管理員"設定成"Debug",請輸入:
opencv_calib3d2413d.lib
opencv_contrib2413d.lib
opencv_core2413d.lib
opencv_features2d2413d.lib
opencv_flann2413d.lib
opencv_gpu2413d.lib
opencv_highgui2413d.lib
opencv_imgproc2413d.lib
opencv_legacy2413d.lib
opencv_ml2413d.lib
opencv_nonfree2413d.lib
opencv_objdetect2413d.lib
opencv_ocl2413d.lib
opencv_photo2413d.lib
opencv_stitching2413d.lib
opencv_superres2413d.lib
opencv_ts2413d.lib
opencv_video2413d.lib
opencv_videostab2413d.lib

**2413為OpenCV版本,會隨著改版而變更,可以至OpenCV安裝路徑中確認。

15. 選擇"方案總管" > "Project1" > "原始程式檔"按"滑鼠右鍵",選擇"加入" > "新增項目"。

16. 選擇"C++檔"後按"新增"。

17. 輸入測試程式。
1
2
3
4
5
6
7
8
9
10
11
#include <opencv/highgui.h>
int main()
{
    IplImage * img = cvLoadImage("image.png");
    cvNamedWindow("image");
    cvShowImage("image", img);
    cvWaitKey(0);
    return 0;
}

18. 在計畫的原始碼路徑中加入".png"圖檔。

19. 執行程式結果。